 |
| Home made Ngorhiang! |
Ingredients for Limpeh's healthy Ngorhiang
3 pork steaks - chopped up into bite sized chunks
Marinade for the pork: soy sauce, chilli sauce, black bean sauce, sesame oil, pepper, lime juice, salt
1 packet of dried bean curd skin
1 carrot, 1 potato, 1 courgette cut into very thin strips
Step 1: Marinade the pork with soy sauce, chilli sauce, black bean sauce, sesame oil, black pepper, lime juice and anything else you like. Leave it to sit in the fridge for at least two hours. (Feel free to use chicken instead of pork if you prefer. I have even used venison for this at Christmas.)
Step 2: Prepare the vegetables, cut them into thin strips. I used carrot, courgette and potato this time, but feel free to experiment with other vegetables you like!
Step 3: Open your packet of bean curd skin and cut the skins up into the appropriate size to wrap the Ngorhiang.
Step 4: Only work one piece of bean curd skin at a time, do not soak them en masse!
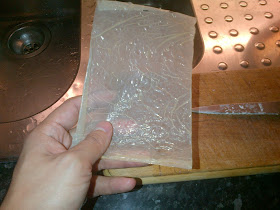
Step 5: Put the bean curd skin into water for no more than a few seconds on each side, the water should be room temperature - do NOT use hot water.
Step 6: Within a few seconds, the bean curd skin will be soft enough to work with - do not soak it for too long as it would cause the skins to disintegrate.
Step 7: Place some pork and vegetables in the middle of the bean curd skin. Do not overfill the Ngorhiang as you risk bursting it when you roll it.
Step 8: Fold in the sides of the skins towards the middle.
Step 9: Roll up your Ngorhiang tightly.
Step 10: Repeat the process to make more Ngorhiangs, I created 20 Ngorhiangs with my 3 pork steaks - yes I know there are only 16 in the picture below, I couldn't fit them all into the baking dish! Once your Ngorhiangs are ready, bake them in the oven at 180 degrees for about 20 - 30 minutes. You need to turn the Ngorhiangs regularly to ensure that they do not stick to the baking tray. You may find that some juices will start to run from the pork and vegetable stuffing in the Ngorhiang. If this happens, then simply drain the juices (and use it for something like a stock or a gravy - it's tasty stuff). Draining the juices is important if you want the bean curd skin to go crispy in the oven. I suppose you could deep fry it (that's what they tend to do in Singapore) and I know they steam it too sometimes, but I prefer to bake it as the bean curd skin does become crispy and golden brown without greasiness of deep fried food.
Once your Ngorhiangs are ready, serve them with salad and chilli sauce. I'm sorry I didn't have the chance to garnish the dish before taking this photo and my guests dived in and devoured them before I had the chance to take a second photo! They were that good. All in all, preparation time (excluding the marination time) was about an hour. Yes it is a labour intensive task to roll up each individual Ngorhiang, but I think it's worth the effort. Ngorhiangs tend to come across as cheap snack food in Singapore because hawkers cut corners by using cheap mince meat and vegetables to pad up the stuffing, but I prefer to use quality cuts of pork for my Ngorhiangs and it does create a quality dish.
I shall leave you with a photo of the venison Ngorhiangs I made at Christmas time. Please do try this out and let me know how you get on, thanks for reading.


Very nice! Gonna have to bookmark this and try it when I have the time and energy to actually get the materials and tools to do it. Thanks!
ReplyDeleteDefinitely something worth making - I think the humble Ngorhiang doesn't have a great reputation because hawkers cut corners and use cheap ingredients but as you can see from my recipe, you can jazz it up with quality ingredients. I would love to try making it with some nice fish and do a seafood Ngorhiang version.
DeleteYah, if I do it, I'd definitely be using chicken or beef.
DeleteFish is a little difficult to work with since I am not equipped (nor have the time) to deal with anything other than frozen meats, and thawing fish is an art I have little time and energy for. For example, my frozen halibut fillets go straight into the oven with the seasoning and sauces around them in the pan. Imagine my joy when I found out I could do that instead of having to thaw them first! :P.
If you're going to use beef, make sure it is a quality piece of beef. I'm less keen on beef personally as it can be a bit tough if you overcook it but if you stick to quality cuts of beef, you should be fine.
DeleteDon't you have a microwave for defrosting frozen food? That's what I do. Bung the frozen item in the microwave and set it to 'defrost' for like 10 minutes.